Wednesday, March 5, 2014

Memory Quilt

Center square, overall bib

The finished product

Outer border (on left in this photo), the legs from the overalls

The bright royal blue sashing between each square is from a jacket he wore


This quilt was made in memory of a brother who passed away at the young age of 22.  Of course, any age is too young when you have a close sibling pass away. I like the idea of a memorial quilt. It's something that can comfort you  physically and mentally. Just looking at each square can tug at your heart, drawing visions of your loved one wearing that shirt (or overalls), an activity or event when he wore that shirt. In this instance, he wore overalls as his "trade" uniform, construction.  He went fishing with his brother and the 2 plaid shirts on ether side of the overall bib are the 2 shirts they wore the  last time they went fishing together.  I used the legs of the overalls to make the outer border on the quilt. The backside is royal blue fleece to match the sashing on the front between the squares. My friend said her husband cried and said this quilt was the best gift he could've received. I truly hope he has fond memories every time he looks at the quilt.
Now, after 1 year of his passing, I am working on memorial quilts for my kids, made from their grandpa's shirts (in between orders from customers). I'd like to think of memorial quilts as snuggly scrapbooks. 

Thursday, February 27, 2014

I've Got a Secret: Hidden Tabs, Hidden Rings

Hidden tab top curtains
Tabs pinned to the top hem of the panel.

The bottom of each tab is pinned up under the top hem and the top of the tab is pinned 1/4" from the top of the panel (which is in the bottom of the photo here).

All of the tabs pinned and ready to sew.

Floral pattern fabric

Close-up shows how they look on the rod.

The finished product!


This shows the back side, how the panel is hung on the rod. 
These hidden tab curtains have a long enough tab that you can open and close the panels without a pull rod or the type of rod that requires curtain hooks and a string to pull. I did some full-length pleated curtain panels with hidden rings.
Pleated panels with rings sewn behind the pleats

Another close-up of the top of the panels

Full-length panels in front of French doors

The full-length panels, closed

"What rings?" you ask. They were hand-sewn behind the pleats. She wanted the ease of opening and closing the panels, just sliding on a decorative wooden rod but she didn't want the rings to show. I didn't get a photo of the backside to show but, trust me, they are there. The hidden tabs give you the same basic ease of sliding the panels open but a "wave" effect at the top of the panel. The pleats in the black panels give them added fullness. The floral didn't need the pleats to add fullness. It depends on the fabric you use. The black panels are silk and the floral panels are cotton. 

Wednesday, December 18, 2013

It Hits the Spot

Oh yeah! It hits the spot on a cold winter day. My loaded potato soup garnished with green onion, bacon,  shredded cheddar cheese, and sour cream.

Here is the broiler pan I lined with heavy duty foil. Line the bottom pan as well as the top pan, making slits in the top pan where the slits are in the pan. 

Make 1 layer of bacon and place in oven at 350 degrees. It takes 20-30 mins depending on how crisp you like your bacon and how thick the slices are. 

I like mine crispy!

Have a bite!

       I should've taken a photo of the pot of Loaded Potato Soup but I was so hungry I barely remembered after I dished it up! I've had several requests for the recipe so I thought I'd post here. It's so simple and you can substitute several ingredients if you don't have the one specified. How easy can you get!?
      A little cooking tip: save and freeze chicken stock when you boil chicken for other recipes. I save it in ziploc bags of different sizes from 1 cup to 1 quart. Then when I need a cup of chicken broth/stock for a recipe I just take what I need out of the freezer. I use smaller amounts (1 cup) to cook veggies and gravy, 1 quart or more, for soups. It tastes better than store-bought, it's less expensive, and you know what's in it. I'm not a fan of all the added salt and preservatives in prepared foods from the store.
     Another tip: cook your bacon in the oven. No, it doesn't splatter all over the oven and you don't have to flip it over like in a frying pan. You just lay the slices on a broiler pan (see above on how to prep pan for minimal clean up). Some recipes tell you to place in cold oven but I've pre-heated and placed in cold oven and don't see a difference. Bake at 350 for 20-30 minutes depending on how crispy you like your bacon. Thicker slices take longer too. You don't have to turn the bacon either. After you're finished, let the pan cool, fold the foil up from the edges and dispose of grease that way, minimum clean-up! 

LOADED POTATO SOUP
- 6 medium potatoes, peeled (or not, if you like the skin) and cubed
- 1 quart chicken broth (substitute water and a couple of chicken bouillon cubes if you don't have broth)
- 2 cups water
- 1 (12 oz) can evaporated milk( substitute whole or skim milk if you prefer, mixed with a tablespoon cornstarch)
- 1 lb. bacon
- 1 bunch green onions, tops chopped
- 1 cup Velveeta, cubed (substitute shredded swiss, cheddar or whatever cheese you like)
- 1/2 cup sour cream
- shredded cheddar for garnish
- sour cream for garnish

  Boil potatoes with water and chicken broth in large dutch oven.  While the potatoes are cooking, bake bacon in oven (see instructions above) and crumble. When potatoes are tender (do NOT drain broth/water) , add Velveeta and 1/2 cup sour cream. Roughly mash with hand masher. You want to leave some potato cubes in soup. Heat over medium heat until Velveeta is melted, stirring often so it doesn't scorch. Add bacon. It's ready to eat now! Garnish each bowl with as much cheese, green onion, and sour cream as you like.


Sunday, November 24, 2013

Every Piece Has a Story

This quilt has the pink velour border made from a pair of Grandma's favorite painting pants. The center shirt is complete with spots and stains, evidence that Grandma loved to cook. 

The sashing is made from the same pink velour as above quilt. 
      I am a history nerd. I confess. Maybe that's why I love making these quilts.  Each quilt tells a family's history. There are as many different stories as there are shirts and I love to hear about them.  A box or bag of shirts might have most people scratching their heads and tossing the box or bag in the garbage or "donate" bin. I see a big soft scrapbook. Yes, to me, these quilts are scrapbooks you can wrap up in and  your mind wanders to a certain time when you or a loved one wore those shirts. It was a club or sports team your child was a part of or a shirt from a vacation or just one of your favorites, too worn out to wear again but too sentimental to throw away.
     These 2 quilts will be for 2 little girls who lost their Grandma too soon. They have a combination of shirts Grandma wore and shirts the girls outgrew, a couple of them gifts from Grandma. I used a combination of light denim and pink velour for the borders and sashing. The pink velour was from a pair of pants Grandma wore, complete with stains from a favorite hobby of hers, painting. As her daughter explained, Grandma loved to paint, cook, and the stains on the fabric is a part of her story.
     The girls may not remember everything about their Grandma but they have a permanent "scrapbook" to hold and snuggle under. Mom can point out different shirts and tell the girls a fond memory about each one and her mom's legacy will stay alive, a reminder that the girls had a Grandma who loved them very much. I think the girls will treasure their Christmas gifts!
Close-up of quilt with bright pink back.

Close-up of purple backed quilt, the pink and white shirt is one the grand daughter outgrew. 

Pillow made from 1 shirt and below shows the back side of the pillow. It is bordered with the pink velour.

Back side of above pillow made form Grandma's sweater.   

Monday, November 18, 2013

Fighting Mad!


My friend, Tish, is fighting mad. No, not, at someone, at cancer. She decided she would wear do-rags once she lost her hair from the chemo. Her favorite college football team is University of Tennessee. We searched and searched for a UT do-rag but they don't make them! Go figure, they make everything else with the "T" logo on it. So I got a blue do-rag from her to make a pattern and made one for her myself! I used 1/3 yard of fabric. That's about all you need but I could have used a half yard with this one because of the print on the fabric. I was trying to get the "T" centered on the d-rag and I had to kind-of piece the fabric together to get the "T" centered.
I cut 1 piece 20" long and 4" wide for the front part that wraps around the forehead. Then I cut 2 pieces 10" long and 2" wide for the ties.  On the right is the  "pattern" blue do-rag. 
I sewed the 20"x4" inside out lengthwise to make a tube then turned right side out and pressed so the seam was in the center on the backside. 
This shows the backside of the forehead piece. Mine looks off-center because I was centering the "T". Usually the seam is centered more.
Press the long edges of the 2 10"x2" pieces twice to make a finished edge about 1/8" each time and top-stitch. Then sew to forehead piece  at each end. 
Flip over to outside and top-stitch so it lays right. 
These are the side panels. They are 9 3/4" long and 5" at the widest point. The left side (which is the pointy edge) goes toward the front, the right side toward the back. 
Okay, I know this looks crooked but it's just the way the "T" is printed on the fabric. This is the tail of the do-rag. It goes on the back bottom. I just cut out the piece 4 1/4" on each side and 6" at the widest part. Measuring top to bottom is 7". I folded 1/8" twice and pressed the seam before I top-stitched it.
This is my top piece. I forgot to measure it. In the bottom of this photo is the "front". 
I sewed the front of the top piece to the forehead piece then top-stitched so it would lay right then sewed my side "eye shaped" pieces to all of it. 
This shows where I sewed the tail to the back.
Here are the side "eye-shaped" pieces sewn to the forehead piece. 

Friday, November 8, 2013

Turn Me Loose Like a Kid in a Candy Store

My daughter, Cassidy, started college this fall and, being the obsessed-with-fixing-up-everything-with-fabric mom, I went into bedding sewing overdrive. Since our son moved home to go to school locally,we saved his dorm bedding for "someday I'll need this". He had everything navy and brown.We went to Short Sheets in Crossville. Let's just say I was like a kid in a candy store! 
She already picked out the bedsheets at Target in teal. I made the duvet cover reversible, red and white on 1 side,  grey on the other. 

Monday, October 28, 2013

In Memory of...

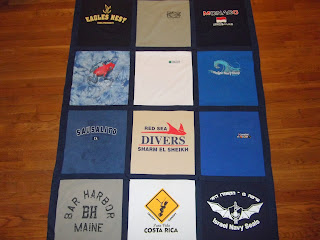
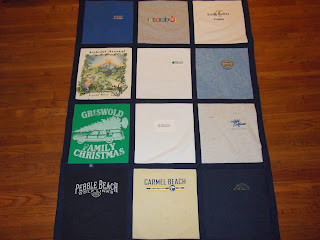
The 3 quilts, folded

Big stack of t-shirt scraps

Quilt 1

Quilt 2

Close-up quilt 3

Quilt 3

Another close-up with corner turned down to show navy fleece backing

The 3 quilts folded and stacked

I finished 3 quilts last week for someone who wanted a special Christmas gift for her family. Her dad passed away and he had a lot of t-shirts from his travels. I love making memorial quilts and hearing the story behind each shirt. I also love that every quilt is customized for each person, no two are alike, even the 3 seen here made from the same person's shirts. They are all different, each family member will have their own special treasure to remember Dad.